How to Deadlift: Complete Form Guide
11 min read · September 2026 · by Manikanta Sirumalla
Pick a heavy thing up off the floor and put it down. The deadlift is the most fundamental strength movement there is, and one of the most productive: it trains the entire posterior chain, the grip, the trunk and the upper back, and it loads the spine and hips in a way that builds bone and resilience. Done badly, it is also the lift most likely to make your back sore. This guide covers the technique that makes it safe and strong.
What the deadlift trains
The deadlift is a hip hinge with a knee extension. The glutes and hamstrings extend the hip; the quads extend the knee from the floor; the erectors, lats, and abdominals hold the spine rigid and keep the bar close; the traps, rhomboids and grip hold the bar. EMG studies show it among the highest activators of the glutes, hamstrings and spinal erectors of any exercise (Martín-Fuentes et al. 2020). It is also one of the best builders of the upper back and grip in the gym, which is why it appears in both leg and back programs.
Setup: the bar and the feet
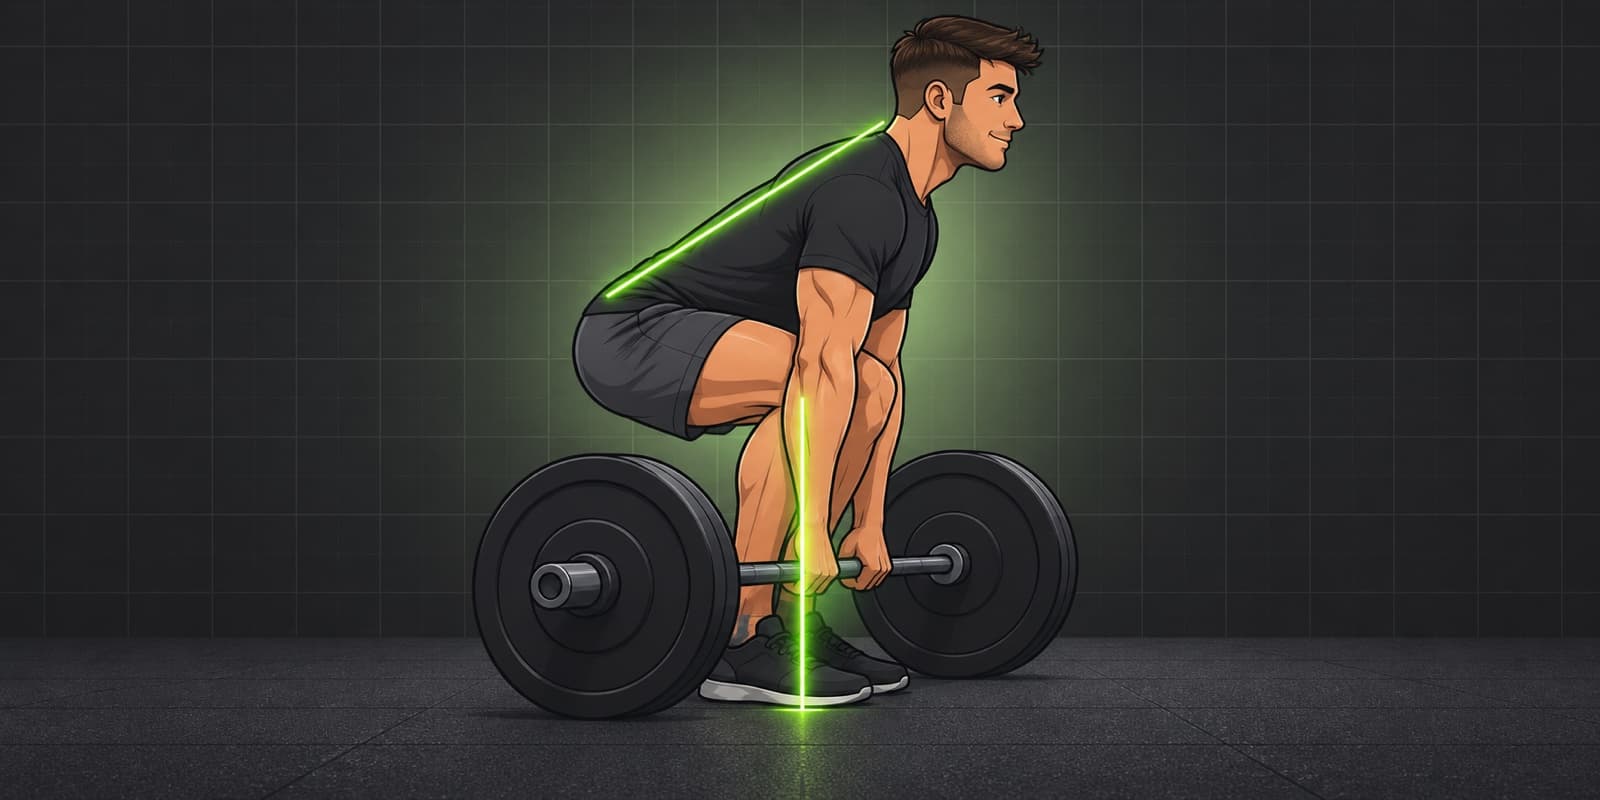
Bar position. The bar should be over the middle of your foot, about 2 to 3 cm from your shins when you are standing upright. Not touching the shins, not over the toes. From above, the bar cuts the foot roughly in half. This position puts the bar over your balance point, so it can travel straight up.
Stance (conventional). Feet about hip width apart, narrower than a squat stance. Toes straight ahead or turned out slightly. The narrower stance leaves room for the hands outside the legs.
Plates. A standard 20 kg plate sets the bar about 22 cm from the floor. If you train with lighter weights on small plates, the bar sits lower and the setup becomes a deficit deadlift, which is harder on the back. Use bumper plates or blocks to keep the bar at standard height until you are lifting full-size plates.
Setup: the hinge and the grip
- Stand with the bar over mid-foot, feet set.
- Push the hips back and bend forward at the hips, keeping the back flat, until your hands reach the bar. Let the knees bend as needed. The shins will move forward to touch the bar.
- Grip the bar just outside the shins, double overhand, hands about shoulder width. Keep the arms straight; they are hooks, not lifters.
- With the hands on the bar and the shins against it, set the back: lift the chest, pull the shoulder blades down and back slightly, and create a neutral spine from neck to tailbone. The hips will be higher than the knees and lower than the shoulders.
- Look at a point on the floor a few metres ahead, neck neutral.
- Pull the slack out of the bar: apply upward tension so the bar rises to the top of the plate holes and you feel the lats engage and the whole body tighten. This is the step most beginners skip.
At this point, from the side, your shoulders should be slightly in front of the bar, your hips somewhere between knees and shoulders, and your arms vertical. Where the hips end up depends on your limb lengths: long-legged lifters set up higher, long-torsoed lifters lower. Do not force your hips to a picture; let the bar-over-mid-foot and straight-arms rules put them where they belong.
Bracing
Before the pull, take a deep breath into the belly and brace the abdominal wall outward, as if about to be punched. Hold it through the lift; exhale at lockout or as the bar passes the knees on a lighter set. This intra-abdominal pressure is what keeps the spine from flexing under load. See the squat guide for the full bracing pattern; it is the same.
A belt worn snugly at the level of the navel increases the pressure you can generate and is a reasonable tool for heavy sets once you have learned to brace without one.
The pull
- Push the floor away. The first movement is leg drive, not back pull. Think of a leg press against the ground. The bar breaks from the floor because the knees extend.
- Keep the bar against the legs. It should drag up the shins and thighs. A bar that drifts forward, even by a few centimetres, multiplies the load on the lower back.
- Hips and shoulders rise together. The back angle stays constant until the bar passes the knees. If the hips shoot up and the back angle flattens, the legs have done their job too early and the back is doing the rest.
- At the knees, drive the hips forward. The glutes finish the lift. The bar continues straight up as the hips come through to meet it.
- Lockout. Stand tall with the hips and knees extended, shoulders back, chest up. Do not lean back or hyperextend the lower back; the lift ends when you are standing straight.
- Lower under control. Push the hips back first, letting the bar slide down the thighs, then bend the knees once the bar passes them. Set the bar down; do not drop it unless the gym allows it and the plates are bumpers.
- Reset. Release tension, re-brace, and set up again for each rep. Touch-and-go reps are a choice, but resetting each rep teaches better setups and is easier on the back.
Common faults and fixes
| Fault | What it looks like | Fix |
|---|---|---|
| Rounded lower back | Lumbar spine flexes at the start or during the pull | Reduce load; set the back before pulling; cue "chest up, lats tight"; strengthen with Romanian deadlifts and lighter volume |
| Hips shoot up first | Back angle flattens before bar leaves floor; lift becomes a stiff-leg deadlift | Cue "push the floor away"; pause deadlifts from the floor; check hips are not set too low |
| Bar drifts forward | Gap opens between bar and shins/thighs | Cue "drag the bar up your legs"; engage lats by "squeezing oranges in your armpits"; check bar starts over mid-foot |
| Jerking the bar | Slack is not pulled out; bar rattles off the floor | Pull the slack out and build tension before the bar moves |
| Hyperextension at lockout | Leaning back at the top | Finish by squeezing glutes and standing tall; stop when the body is vertical |
| Hips too high or too low | Setup looks like a stiff-leg deadlift or a squat | Let bar-over-mid-foot and straight arms set the hip height; film from the side |
| Grip fails first | Bar slips before the legs and back fail | Hook grip, mixed grip or straps for heavy sets; train grip separately with holds and carries |
Film every heavy set from the side. The hips, bar path and spine are all visible from that angle and most faults are obvious on video.
Conventional vs sumo
Conventional. Feet hip width, hands outside the legs. Longer range of motion, more forward lean, more load on the erectors and hamstrings. Simpler to learn for most people.
Sumo. Feet wide, toes turned out, hands inside the legs. More upright torso, shorter range, more work for the quads and hips, less for the back. Biomechanical analysis shows sumo reduces the lumbar shear load and the distance the bar travels, at the cost of a harder start off the floor (Escamilla et al. 2000).
Neither is cheating and neither is inherently safer. Lifters with long torsos and short arms, or with hip anatomy that suits wide stances, often pull more sumo. Long-armed lifters often prefer conventional. Try both for a few weeks, and keep the one that feels strongest with a neutral spine. Training both builds well-rounded strength.
Deadlifts and back pain
The deadlift has a reputation as a back-breaker. The evidence says the opposite for most people. The spinal erectors and the muscles that stabilise the trunk are strengthened by the deadlift more than by almost any exercise, and a strong back is a resilient back. Trials that used deadlifts and other free-weight lifts as a treatment for chronic low back pain reported significant reductions in pain and disability (Welch et al. 2015; Berglund et al. 2015). The people who got hurt in the gym lore were generally rounding the lower back under maximal loads, jerking, or progressing far too fast.
The rules that keep the back safe: neutral spine set before each rep; bar over mid-foot and against the legs; leg drive first; loads that allow perfect technique; and progression measured in kilos per week, not per session. If you have existing back pain, start with the Romanian deadlift and trap bar deadlift at light loads, and get assessed if pain is sharp, one-sided or radiates.
Deadlift vs Romanian deadlift vs trap bar
- Conventional deadlift: from the floor, hips and knees, maximal load, full posterior chain.
- Romanian deadlift: from standing, hips only, bar stops at mid-shin, hamstrings and glutes emphasised with lighter loads. The best assistance lift and the best starting point for people learning to hinge. See Romanian Deadlift (RDL) Guide.
- Trap bar deadlift: neutral handles at the sides, more upright, more quad, less lumbar shear. An excellent choice for beginners, athletes and anyone with a sensitive back.
- Deficit, block and pause deadlifts: variations to strengthen specific parts of the lift for experienced lifters.
Programming
- Beginners: 1 to 3 sets of 5 reps, once or twice a week, after squats, adding 2.5 to 5 kg per session while form holds.
- Hypertrophy: 3 to 4 sets of 5 to 8 reps, once a week, plus Romanian deadlifts on a second day. Deadlifts are fatiguing; higher reps from the floor are rarely the best use of recovery.
- Strength: 3 to 5 sets of 1 to 5 reps at 80 to 90 percent, once a week, with a lighter variation day.
- Warm-up: bar with light plates, then 50, 70, 85 percent for decreasing reps. See How to Warm Up Properly.
- Recovery: the lower back and nervous system recover slowly from heavy pulls. Do not deadlift heavy the day before squatting heavy.
The bottom line
Bar over mid-foot, hinge down with a flat back until the hands meet the bar just outside the shins, chest up and shoulders slightly ahead of the bar, pull the slack out, breathe and brace, then push the floor away and drag the bar up the legs, hips and shoulders rising together, to a tall lockout. Neutral spine, bar on the body, leg drive first. Choose conventional or sumo by build, reset every rep, film from the side, and add weight patiently. Done this way, the deadlift makes backs stronger, not weaker.
Sources
- Martín-Fuentes I, Oliva-Lozano JM, Muyor JM. "Electromyographic activity in deadlift exercise and its variants. A systematic review." PLoS One, 2020.
- Escamilla RF, Francisco AC, Fleisig GS, et al. "A three-dimensional biomechanical analysis of sumo and conventional style deadlifts." Medicine and Science in Sports and Exercise, 2000.
- Welch N, Moran K, Antony J, et al. "The effects of a free-weight-based resistance training intervention on pain, squat biomechanics and MRI-defined lumbar fat infiltration and functional cross-sectional area in those with chronic low back." BMJ Open Sport and Exercise Medicine, 2015.
- Berglund L, Aasa B, Hellqvist J, Michaelson P, Aasa U. "Which Patients With Low Back Pain Benefit From Deadlift Training?" Journal of Strength and Conditioning Research, 2015.
- Hales ME, Johnson BF, Johnson JT. "Kinematic analysis of the powerlifting style squat and the conventional deadlift during competition: is there a cross-over effect between lifts?" Journal of Strength and Conditioning Research, 2009.
- Bird S, Barrington-Higgs B. "Exploring the deadlift." Strength and Conditioning Journal, 2010.
Frequently asked questions
Is deadlifting bad for your back?
Not with sound technique and sensible progression. Deadlifts strengthen the muscles that support the spine, and trials using deadlifts and other free-weight lifts in people with chronic low back pain report reduced pain and disability. Injuries come from rounding under maximal loads, jerking the bar, and adding weight too fast, all of which are avoidable.
Conventional or sumo deadlift?
Both are legitimate. Conventional (feet hip width, hands outside the legs) uses more back and hamstring; sumo (wide feet, hands inside the legs) uses more quads and hips and shortens the range. Longer-torsoed, shorter-armed lifters and those with hip mobility often prefer sumo. Try both for a few weeks and keep the one that feels strongest with a neutral spine.
Should my back be completely straight when deadlifting?
Neutral, meaning its natural gentle curves, held rigid by bracing. A small amount of upper-back rounding under heavy loads is seen in elite lifters and is not harmful for them, but rounding in the lower back under load is the fault to avoid. Beginners should aim for a flat back throughout.
Should I use a mixed grip or straps?
Double overhand until grip fails, then a hook grip, mixed grip or straps. Mixed grip is strong but creates a slight asymmetry and a small biceps tear risk on the supinated arm. Straps let you train the back and legs beyond your grip and are appropriate for heavy sets; train grip separately.
Why does my lower back hurt after deadlifts?
Usually one of: rounding the lower back under load, starting with the hips too high so the back does the lifting, hyperextending at lockout, too much volume too soon, or simply the normal muscle soreness of the erectors after a hard session. Film your sets, reduce the load, and fix the setup. Pain that is sharp, one-sided or radiates down the leg needs assessment.
How often should I deadlift?
Once or twice a week for most people. Heavy deadlifts are fatiguing for the whole body and the lower back recovers slowly. One heavy session and one lighter or variation session (Romanian deadlift, deficit, pause) is a common and effective structure.